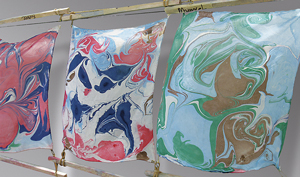
 Marbling is the process of floating paint on the surface of treated (or sized) water. Very popular in Europe in the nineteenth century, marbled fabric and paper were commonly used as a decorative materials for book covers, and for lining drawers, trunks, and bookshelves
What you need:
• Squares of white fabric. We like to use silk handkerchiefs, sold at art/craft stores.
• Gallon pitcher
• Two large trays (slightly bigger than your fabric) and at least 3 inches deep
• Tools to stir: chopsticks, plastic fork, and comb (homemade cardboard or regular)
• Newspaper
• Two sticks
• Four rubber bands and safety pins
• Alum (sizing agent), methocel (water thickener), household ammonia
• Airbrush colors or a marbling kit. (Kits are available at most craft stores and contain methocel and alum. Look for the Jaquard brand.
 What you do:
1. Add ¼ cup of alum to a quart of warm water and stir until dissolved.
2. Soak fabric in solution for 10 to 20 minutes. Squeeze out and air dry.
3. Fill another pitcher with a gallon of warm water and 1 Tbsp of ammonia.
4. Slowly stir in 4 Tbsp of methocel until completely dissolved.
5. Pour two inches of solution into large tray and wait 30 minutes.
6. After 30 minutes, drag a piece of newspaper across the surface of the bath. This will break the surface tension, which will allow colors to spread.
7. Hold the bottle of color a few inches from the water; drip colors onto the surface. Use as many colors as you like, create a pattern, or place drops of color randomly.
8. Colors will spread.
9. Fill the other tray with tap water.
10. Attach safety pins to each corner of fabric square. Take two sticks the same length as the fabric and tie two rubber bands on each end of the sticks. Connect a safety pin from the fabric to each rubber band to help you drop the fabric into the bath and keep your hands clean.
11. Use the chopsticks, plastic fork, or comb to gently swirl designs into the colors. You can go back and forth, crisscross, or circular motions to make neat patterns. Make slow, gentle motions and be creative.
12. Holding onto the sticks, gently lower fabric onto the surface, making sure it lays completely flat.
13. Lift off your fabric and gently rinse in second tray of water. The water rinses off excess color or gel.
14. Place aside to dry.
15. Repeat steps to keep creating!
16. To heat-set, use iron on back-side of fabric for at least two minutes.


